


Automating and streamlining the software development lifecycle through continuous integration and continuous delivery (CI/CD) is a cornerstone of software development today. One of the easiest tools for CI/CD is GitHub Actions, a workflow framework that is built into GitHub. This article presents a gentle, hands-on introduction to using GitHub Actions.
Get started with GitHub Actions
GitHub Actions is a CI/CD platform developed and maintained by GitHub. The actions in this framework are defined in YAML files placed in a project's /workflows directory. When someone checks in to the project, GitHub automatically runs the actions that have been defined.
GitHub's web UI includes support for GitHub Actions, which is a quick way to get your feet wet with the platform. You’ll need a GitHub account, which is free and easy to set up.
Once you have an account, create an empty repository. This is where you'll test out some actions. From the main dashboard, click the New button in the left-hand repository pane. (You can also go to your Repository page by clicking on your account icon in the top-right corner and selecting Your Repositories.) When creating the repository, you can use any name you’ll remember (mine is infoworld-actions). That’s the only required field.
A simple build workflow
Now, GitHub will take you into the repository, where you should notice an Actions tab. Click that. You'll see a listing of pre-built templates, as shown in Figure 1.
 IDG
IDG
Figure 1. The GitHub Actions template gallery
We'll go with something simple to start. Click the Configure button on the Simple Workflow card. This will open the details for the template, as shown in Figure 2.
 IDG
IDG
Figure 2. Simple workflow detail
Notice the template is creating a file at infoworld-actions/.github/workflows/blank.yml. That is the default directory for GitHub Actions. You can name the file anything, and you can have more than one workflow file. Listing 1 shows the body of an action. This action takes a few basic steps whenever someone checks in to the main branch. It's simple enough to give us a good look at the general outlines of an action.
Listing 1. A simple workflow action
# This is a basic workflow to help you get started with Actions

name: CI

# Controls when the workflow will run
on:
  # Triggers the workflow on push or pull request events but only for the "main" branch
  push:
    branches: [ "main" ]
  pull_request:
    branches: [ "main" ]

  # Allows you to run this workflow manually from the Actions tab
  workflow_dispatch:

# A workflow run is made up of one or more jobs that can run sequentially or in parallel
jobs:
  # This workflow contains a single job called "build"
  build:
    # The type of runner that the job will run on
    runs-on: ubuntu-latest

    # Steps represent a sequence of tasks that will be executed as part of the job
    steps:
      # Checks-out your repository under $GITHUB_WORKSPACE, so your job can access it
      - uses: actions/checkout@v3

      # Runs a single command using the runners shell
      - name: Run a one-line script
        run: echo Hello, world!

      # Runs a set of commands using the runners shell
      - name: Run a multi-line script
        run: |
          echo Add other actions to build,
          echo test, and deploy your project.
Besides the name of the workflow (which can be anything), there is an on entry in the YAML. Each item in this list defines something that will happen. In GitHub Actions, these are called triggers. In this case, there are two triggers: push and pull_request. These mean: do something when a push or pull request happens. The array that follows defines what branches to watch; in this case, main.
After we’ve defined when things happen, we define what happens. This is done with the jobs entry. Each job is a discrete chunk of work, and by default, they run in parallel. (If you need to run them synchronously, you can say that a job depends on another by nesting a needs keyword in the job and referencing another job name. See the GitHub Actions documentation for more about using jobs in a workflow.)
In this case, we've defined a single job, build, which uses the runs-on field to define what kind of Docker container to use when it spins up a runtime environment. You can use any image found on Docker Hub. In this case, we'll use ubuntu-latest.
About jobs
The steps in a job happen sequentially. In this example, the first step is a uses entry, which makes a call to a built-in action, like so: actions/checkout@v3. Actions let you rely on functionality that is prebuilt. These can be built-in, like we see in this example, or custom defined. The actions/ prefix means this is an action that GitHub includes. In this case, it is the checkout action, version 3. This action looks similar to a script in an NPM package.json file because it is a JavaScript action. (See the GitHub Actions documentation to learn about the types of actions found in GitHub Actions.)
After the job checks out of the main branch, it performs two steps, with the work being done in the run entry. Both of these are simple echo tasks that output their text content when run.
Commit the workflow file by clicking Commit Changes, adding a simple commit message, and clicking Commit Changes again.
Run the workflow
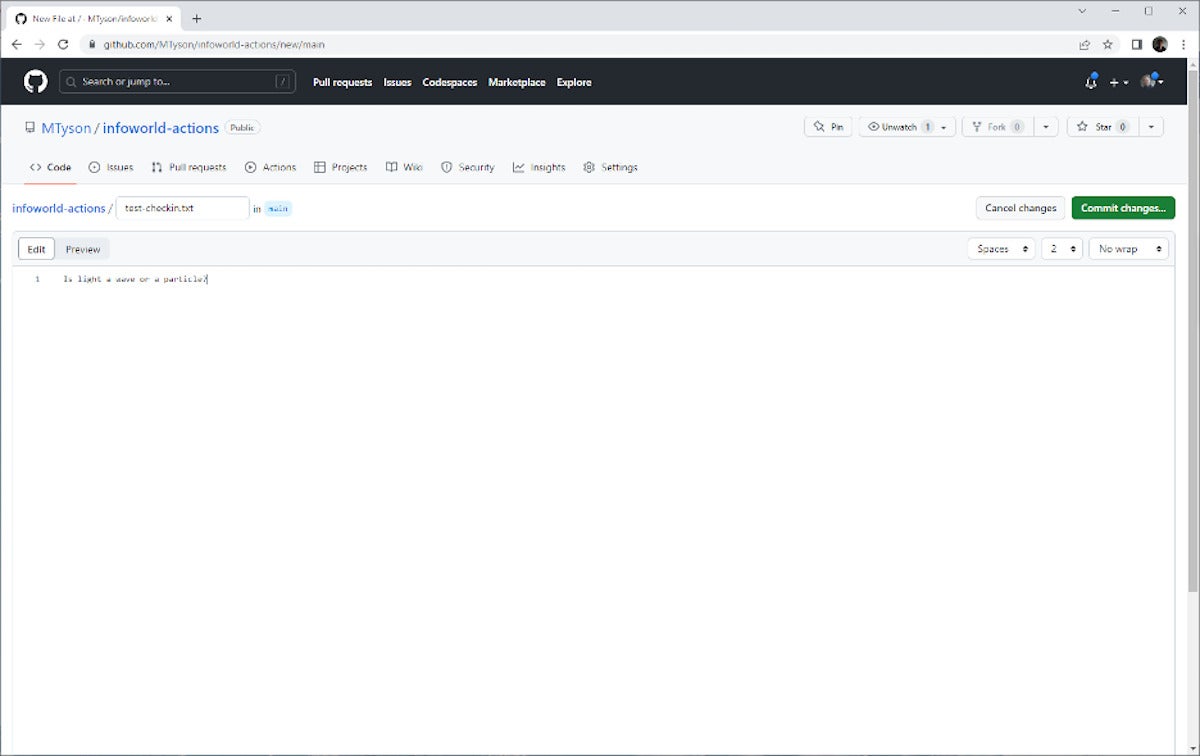
Let’s watch this workflow in action. We can create a quick check-in by opening the repository and in the code tab clicking the create a file link, or the add README.md button. Now, you can make a simple text file, as I’ve done in Figure 3, and commit it. The GitHub Web UI will automatically create, add, commit, and push the new file, hitting the push trigger we just created.
 IDG
IDG
Figure 3. Add a file to trigger the action
We can go see that activity back on the Actions tab. When you open the tab, you’ll now see a list of the workflow runs, as shown in Figure 4.
 IDG
IDG
Figure 4. A listing of all the workflow runs
The current run is labeled "Create README.md” (or whatever file you created). Click on it to view the details of the run. You’ll see each job in the workflow has details accessible by expanding the arrow, as shown in Figure 5. This lets you see the output from checking out the project and the echo statement outputting “Hello, world!” to the console.
 IDG
IDG
Figure 5. Details of a simple workflow run
Use GitHub Actions to create a React application
Now let’s try something more ambitious and create a React application with the create-react-app template. We'll define a simple test in Jest and a workflow that will run the test when the project is pushed. To do this, we’ll use the create-react-app tool from the command line. You’ll need Node, NPM, and NPX installed (the command is npm i -g ngx). From there, we can start the application, as shown in Listing 2.
Listing 2. Create a new React application
$ npx create-react-app infoworld-actions

Creating a new React app in /infoworld-actions.
The new application will include a simple unit test in src/App.tests.js. Once it's done generating, you can run the test with: $npm test, and the test will pass. The test checks for the link in the default UI with the text "learn react." If we change the text for the button in src/App.js to "Learn Kung Fu," the test will fail.
Now let’s add the workflow file to .github/workflows/runtest.yml, as shown in Listing 3.
Listing 3. Run the NPM test script on check-in
name: Run tests on push

on:
  push:
    branches: ["main"]

jobs:
  test:
    runs-on: ubuntu-latest

    steps:
      - uses: actions/checkout@v3
      - uses: actions/setup-node@v1
        with:
          node-version: 16.13.1
      - run: npm install
      - run: npm test
    if: success()
Now, return to GitHub and start a new repository and grab its URL.
Finally, associate this project to the repository we created and push it, as shown in Listing 4. In this example, I’m using a personal access token but SSH works just as well. If you use a token, it’ll need workflow-scope permissions.
Listing 4. Push the new project to trigger the test workflow
git add .
git commit -m "init"
git remote add origin https://<username>:<token>@github.com/<username>/<reponame>
git branch -M main
git push -u origin main
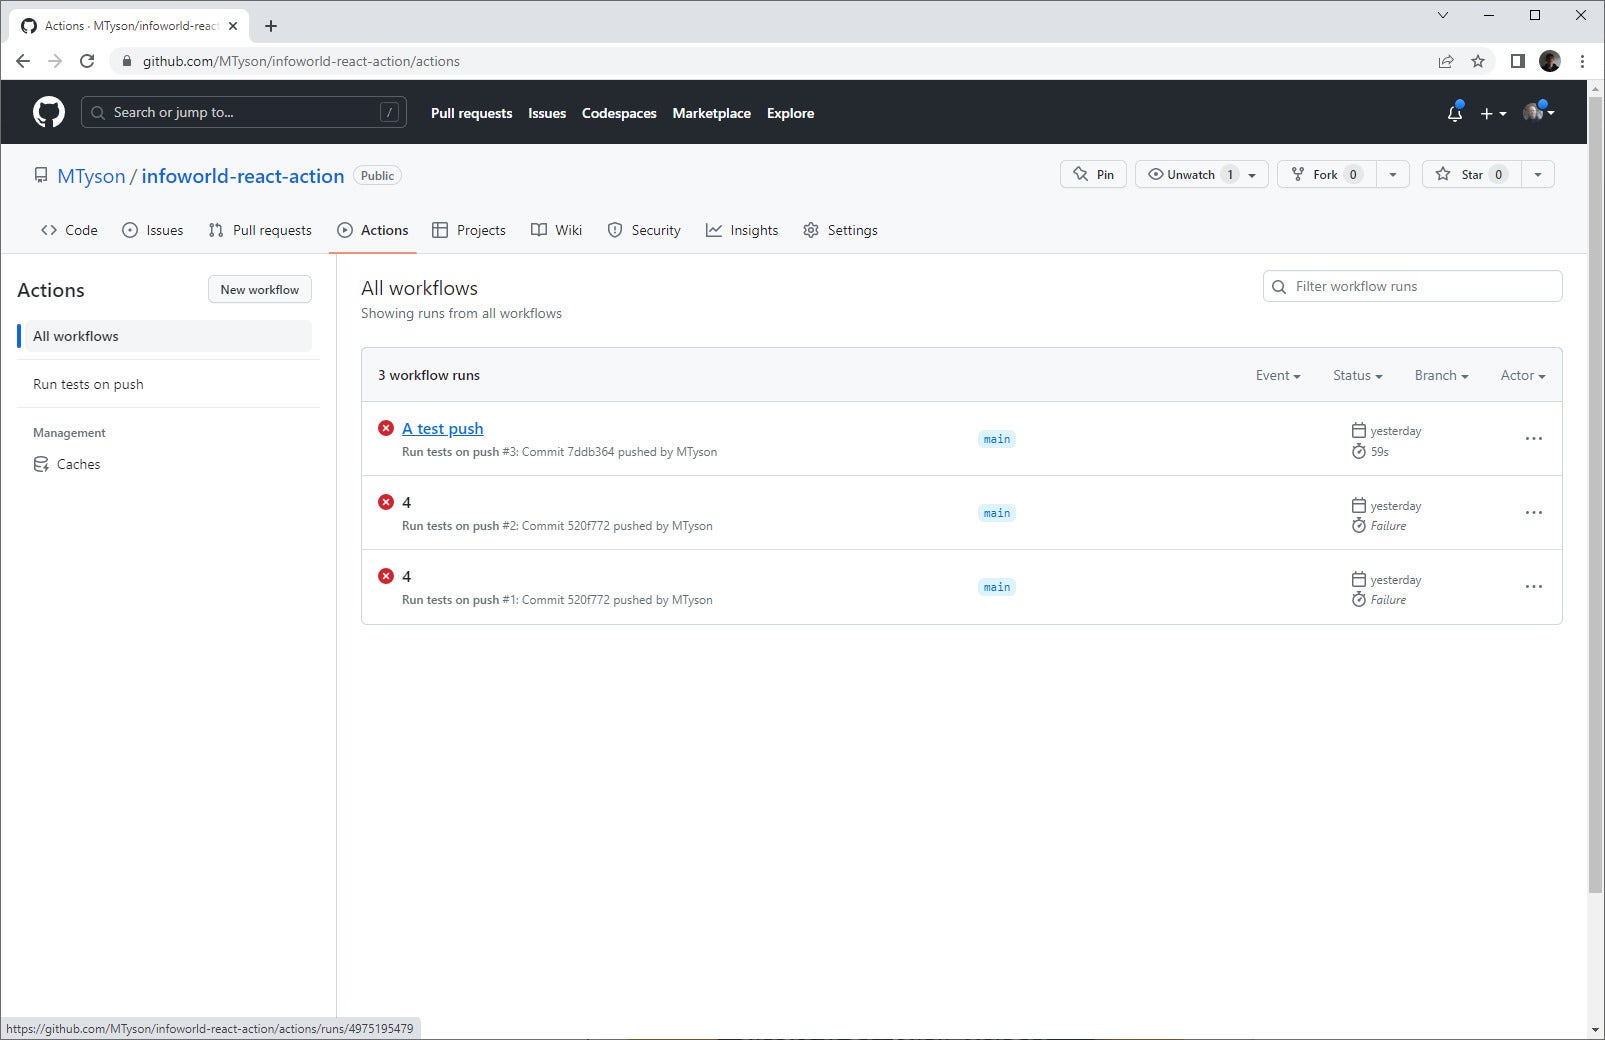
Once you push the project, you can make a small change to trigger the workflow and push again, and you’ll see activity in the repository's action pane, as shown in Figure 6.
 IDG
IDG
Figure 6. New workflow activity
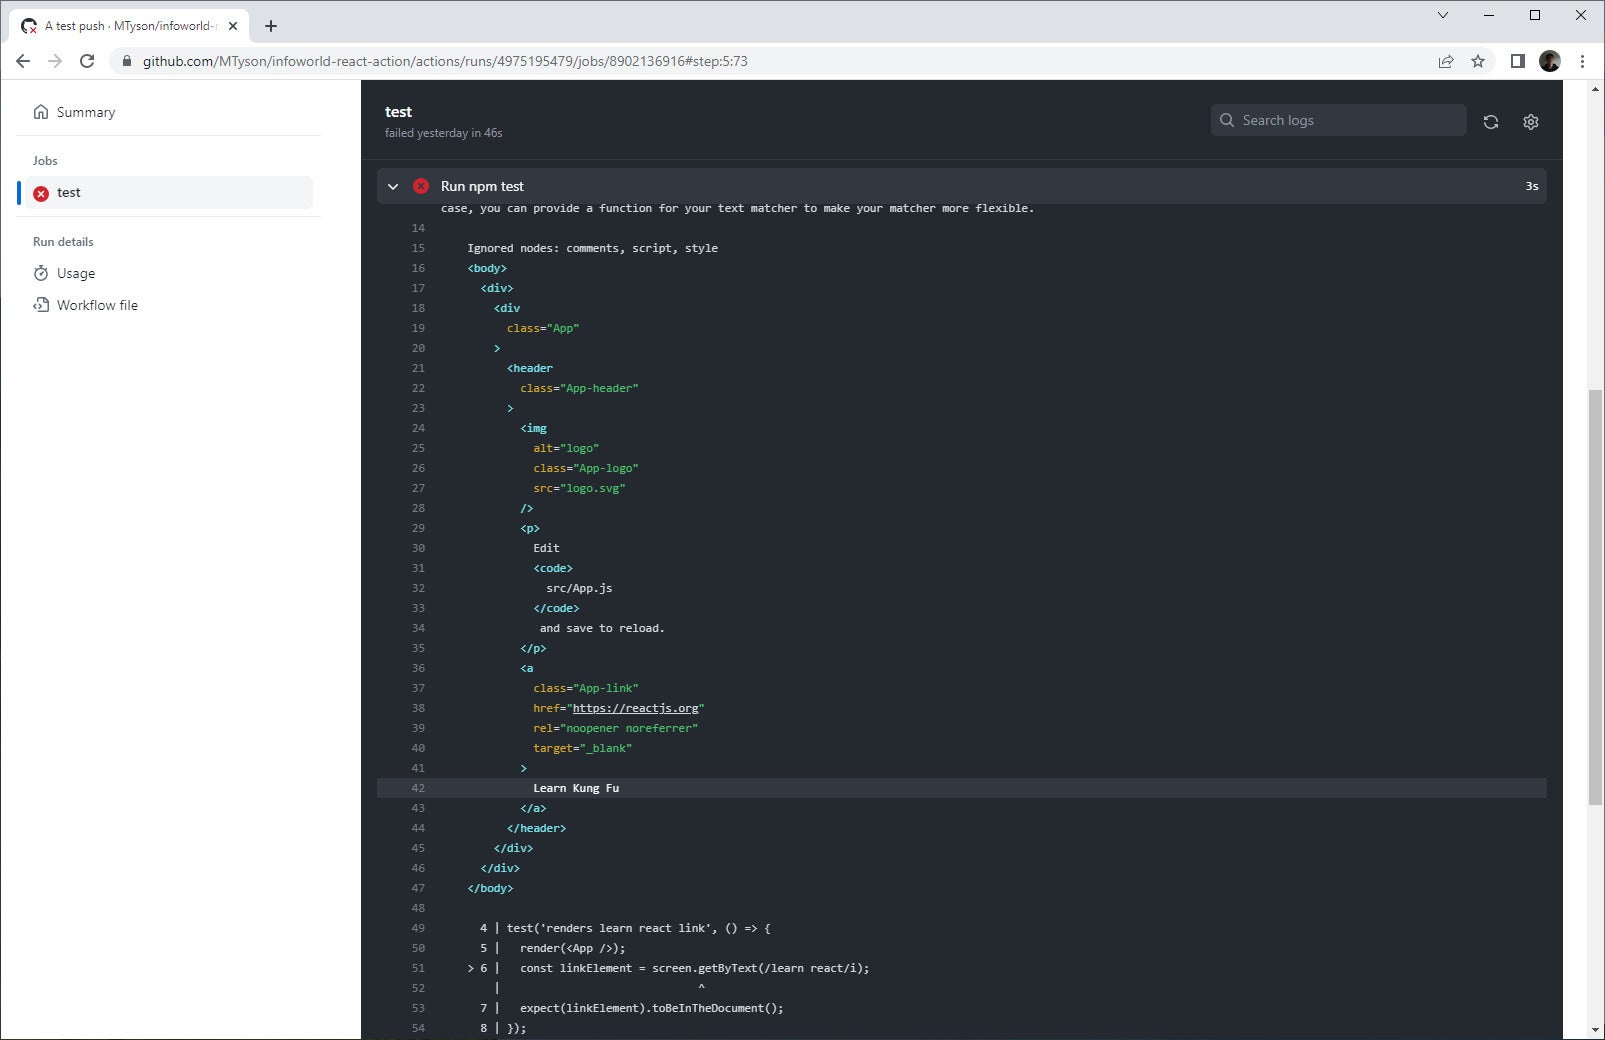
You can drill into the workflow run for details, see that it has successfully checked out the project, installed Node.js, installed the dependencies, run the tests, and output the failed test along with its details, as shown in Figure 7.
 IDG
IDG
Figure 7. Test run detail
Conclusion
This article was a quick and easy introduction to the fundamentals of GitHub Actions, including the very common "test upon checkin" use case and a simple workflow to create and run a React application. You can do a lot more with GitHub Actions, including merging changes across branches and pushing production builds to hosting environments. If you're already working in GitHub and need a way to automate your CI/CD processes, GitHub Actions is the way to go.