


In the beginning was the command-line. That’s true of almost all operating systems, but somewhere along the way a graphical user interface became the “face” of the computer, and only old hackers or initiates even knew how to open a command-line console or terminal.
Many Mac users can manage marvelously without ever opening the Terminal app, much less typing commands into the Bash shell. If you spend your day editing still images with Lightroom, the MacOS command line likely has little utility for you.
More technical users, and especially software developers, need to work in the shell at least occasionally, if not on a daily basis. Technical users with some Unix or Linux background will discover that not all the usual utilities are installed in MacOS as it comes from the factory, even though at its heart MacOS is a BSD Unix system.
As a software developer and a software reviewer, I often run into this issue. The first time it happened I was following online installation instructions that purported to work on Linux and Linux-like systems (such as Mac OS X, as it was known at the time), but had only actually been tested on one or two distros of Linux. The installation command provided was based on wget, a utility for non-interactive download of files from the web.
Unfortunately for me, wget doesn’t come installed on a Mac, although the somewhat similar curl utility does. Translating wget options to curl options was an annoying extra step I didn’t need; the lack of recursive downloads in curl was a complete showstopper for downloading the HTML documentation.
Apple has no official mechanisms for adding new command-line utilities. What it has for a package manager is the App Store, but that’s only for applications (apps). When I searched the web for “wget not found mac” I quickly discovered that there were several ways to solve my problem, including building wget from the source code. Of these, the most frequently recommended was Homebrew.
What is Homebrew?
Homebrew calls itself “The missing package manager for MacOS” (emphasis mine). That's pithy, but a little cavalier. Homebrew is certainly a package manager for MacOS, but there are others, such as MacPorts and Fink. And for that matter, the App Store is a package manager, albeit specialized to, um, App Store apps. Nevertheless, Homebrew is the most popular third-party package manager for MacOS, and supplies functionality missing from the App Store.
You can use Homebrew (brew) to install, uninstall, and upgrade any of thousands of “formulae” (i.e. package definitions) from its core public repository, plus any tap repositories you care to use. You can also use the Homebrew cask facility (brew-cask) as a way to install, uninstall, and upgrade precompiled MacOS binaries (such as apps, but not App Store apps) from the command line. If you wish, you can create your own Homebrew packages and write your own Homebrew formulae.
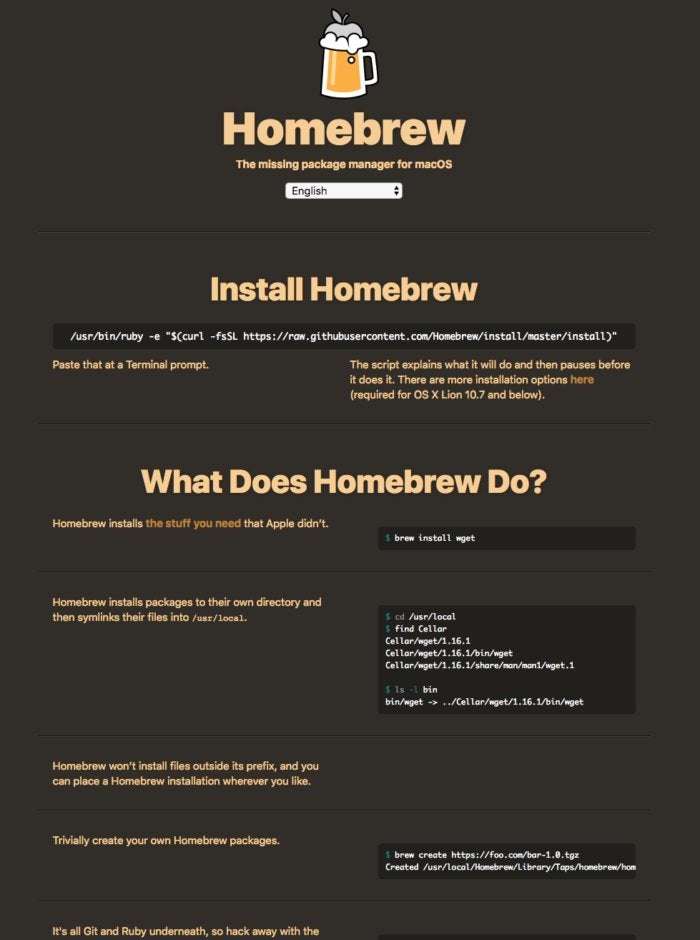
Install Homebrew
Since Homebrew itself is only for MacOS, it has fairly simple installation instructions — at least, if your OS version is more recent than OS X Lion 10.7. Homebrew basically just runs a Ruby script after downloading it from GitHub; you’ll note in the screenshot below that Homebrew uses curl for the download, not wget, for reasons I discussed earlier.
 IDG
IDG
It’s easy to install Homebrew. Just follow the instructions on the website.
Homebrew also confines itself to Ruby code supported by the Ruby version that ships with the oldest OS X version that it supports, 10.5 Leopard.
/usr/bin/ruby -e "$(curl -fsSL https://raw.githubusercontent.com/Homebrew/install/master/install)"
It is possible that the Homebrew installation will ask you to install Xcode or the Command Line Tools for Xcode. Whether it does and which it suggests would be dependent on your OS version and the versions of the C and C++ compilers installed on your system.
According to the Homebrew installation page, if you have an older version of Mac OS X (Lion 10.7 or before), then you need to add the --insecure argument (or equivalently -k, making the full argument list -fsSLk) to the curl command. That’s because the version of curl on your system won’t successfully talk to GitHub using HTTPS. Homebrew will fix that if you install it and then ask it to update itself and its dependencies with brew update.
If you download the install script and read it, you’ll see it includes logic to abort if the Mac OS X version is less than 10.5. If that triggers, the script will refer you to TigerBrew, which is an experimental fork of Homebrew that adds support for PowerPC Macs and Macs running Tiger.
There is also a “we don’t support this version” warning that will trigger for MacOS versions that are too old or too new, currently set at 10.11 and 10.13. That doesn’t mean Homebrew won’t work on those versions; it mostly means that the developers don’t test against them.
Use Homebrew to install a package
As a basic example, let’s try installing wget with Homebrew. First, launch Terminal.
The installation command is just as listed in the image above: brew install wget. On my machine, it produced the rather lengthy output below. Note that the installation began with an auto-update of Homebrew, then installed wget’s dependencies, and then finally installed wget.