


The Anaconda distribution of Python packs a great many libraries and tools for data science and scientific computing under a single roof. Its appeal goes beyond scientific number crunching, though. Anaconda is also useful as a general purpose Python distribution.
But Anaconda comes with its share of snares and subtleties. What if you’re using Anaconda alongside other Python distributions, and you don’t want them stepping on each other’s toes? How do you integrate Anaconda effectively with your other Python tooling, like IDEs? And if you decide you just want to use regular Python, how do you remove Anaconda without breaking anything else?
In this article, we’ll look at how to set up and work with Anaconda alongside conventional versions of Python on the same system. This article assumes you already have some version of Python installed and you have a basic working knowledge of Python before getting started. Note also that most of the guidance here pertains to running Anaconda on Microsoft Windows.
Setting up Anaconda with other Pythons
When you run the Anaconda installer, you won’t be greeted with a great many options. But the few options you are presented with make all the difference when getting Anaconda to coexist with other Python installations.
The first option worth changing is in the “Select Installation Type” menu, where you choose between installing Anaconda for Just Me or All Users. If you’re on a computer where you have admin privileges, choosing All Users makes life a great deal easier, so select that option if you can. If you choose Just Me, the default choice is a subdirectory in your user profile, which may be a little harder to find by default, but is still accessible as long as you know the path.
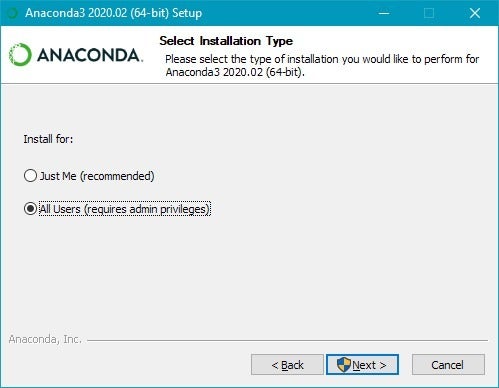 IDG
IDG
Choose the All Users install option if possible, as this will allow you more freedom in terms of where to place the Anaconda directory.
On the next menu page, you’ll be given the chance to change the directory where Anaconda is installed. To make Anaconda easily accessible, place it in a directory (where you have write permissions) that is as high up on the drive as possible. For instance, on my system, I have the D: drive reserved for applications, so I use D:\Anaconda3 as my Anaconda install directory. You may not be able to use a directory off the root of a drive if you’re installing as Just Me, but the simpler the path to Anaconda, the better.
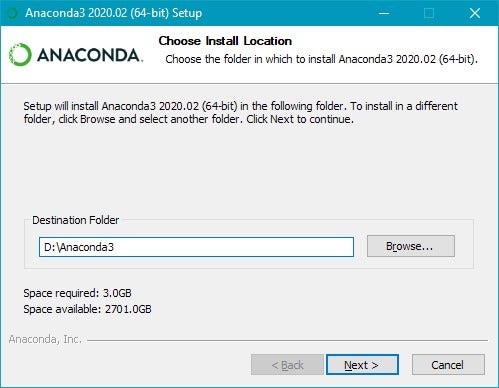 IDG
IDG
Use an install directory that is as close to the root of your drive as possible, for the sake of making its path easy to find.
Here’s the big reason you’ll want an easily accessible path: When you set up Anaconda to co-exist unobtrusively with other Python installations, you may need to manually specify the path to the Anaconda interpreter, because it might not always be auto-detected, and because (by design) it won’t be in your system PATH. The easier it is to find, the less headache later on.
On the next installation screen, you’ll be presented with two options: “Add Anaconda3 to the system PATH environment variable,” and “Register Anaconda3 as the system Python 3.7.” Uncheck both options. The first prevents existing Python installations from having their PATH references short-circuited by Anaconda. The second keeps your existing Python installation registered as the default interpreter in the Windows Registry.
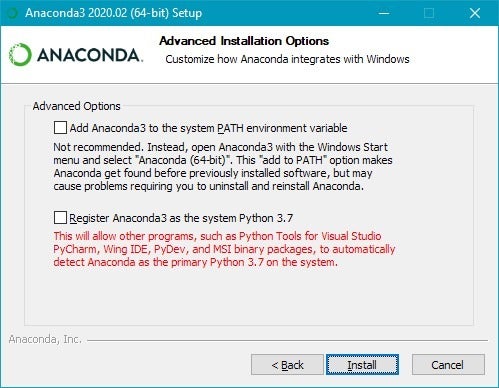 IDG
IDG
Uncheck both of these Advanced Options to ensure that Anaconda doesn’t disrupt any existing Python settings.
Finish the rest of the install normally.
Using Anaconda virtual environments in a command line
Once you’ve completed Anaconda setup, you’ll need to configure command-line access to your Anaconda environments. This can be tricky because of the way Anaconda’s environment system works: For Anaconda to work properly, it has to activate at least one environment, such as the base environment. Just launching Anaconda’s python executable doesn’t do this.
Anaconda provides some shortcuts to launching shell sessions with the base environment activated. For instance, in Windows, an Anaconda PowerShell Prompt shortcut appears in the Start menu after you install Anaconda. Click this shortcut, and you’ll launch a PowerShell session with the base environment activated.
What if you don’t want to use the shortcut, but just want to trigger activation in any PowerShell instance you happen to be in? This is trickier, because you have to execute the same activation routine used in the shortcut.
You can do this by way of a .ps1 script with the following line (assuming Anaconda is in D:\Anaconda3):
& 'D:\Anaconda3\shell\condabin\conda-hook.ps1' ; conda activate 'D:\Anaconda3'
Place that script somewhere in your PATH, and you’ll be able to activate Anaconda manually from any PowerShell session.
Using Anaconda virtual environments in development tools
Most IDEs with Python support today are smart enough to recognize the presence of an Anaconda installation and any virtual environments installed. For instance, Visual Studio Code’s Python plug-in will do this, even if the system PATH isn’t configured to point to Anaconda.
Now the bad news. Some IDEs, including Visual Studio Code, don’t integrate elegantly with Anaconda’s environment activation system. As a result, if you have PowerShell selected as the integrated terminal shell host, the IDE can’t activate an Anaconda environment when you open the integrated terminal.
Fortunately, there is a workaround for VS Code. Edit the .vscode/settings.json file for your project, and add the following setting:
"terminal.integrated.shellArgs.windows": "-ExecutionPolicy ByPass -NoExit -Command \"& 'D:\\Anaconda3\\shell\\condabin\\conda-hook.ps1' ; conda activate 'D:\\Anaconda3' \""
Note that if your path to Anaconda is different, you’ll need to modify the line above accordingly; remember to escape backslashes for Windows paths as in the above.
Now, when you kick open the integrated terminal, the first commands passed to it will be the activation script for the Anaconda environment. You can modify this further to activate a project-specific virtual environment if needed.
Removing Anaconda
If you haven’t set Anaconda as your default Python installation, then uninstalling Anaconda using its built-in uninstaller shouldn’t cause any trouble. Other Python installations should remain untouched and should still work.
If you allowed Anaconda to change your PATH, go through both your user profile PATH and your system PATH and remove any Anaconda-related entries.
Finally, it’s always best to remove Anaconda after performing a full reboot, or at least a logout/login, to ensure that no instances of Anaconda are running. Also make sure you don’t have anything auto-launched in your user profile, like a background task, that runs Anaconda. Otherwise the removal process may balk.
How to do more with Python
- How to use Python dataclasses
- Get started with async in Python
- How to use asyncio in Python
- 3 steps to a Python async overhaul
- How to use PyInstaller to create Python executables
- Cython tutorial: How to speed up Python
- How to install Python the smart way
- How to manage Python projects with Poetry
- How to manage Python projects with Pipenv
- Virtualenv and venv: Python virtual environments explained
- Python virtualenv and venv do’s and don’ts
- Python threading and subprocesses explained
- How to use the Python debugger
- How to use timeit to profile Python code
- How to use cProfile to profile Python code
- How to convert Python to JavaScript (and back again)