


Cloud technology has revolutionized many aspects of software development. One of the most interesting tools to emerge from the cloud is the cloud development environment, or CDE. Like an IDE, a CDE gives you access to a full-blown development environment, but within a browser. Among top-shelf CDE options, one of the most compelling is GitPod.io. Let's get a hands-on look at this innovative cloud-based development tool.
Build a React app with GitPod
Developers are always yearning for more simplicity in our tools. GitPod makes it simple, indeed, to start a project. To begin, we'll need a GitPod account, which is free for public repositories. In my case, I already had a GitHub account and GitPod supports federated SSO (single sign-on) with GitHub, so I just logged in that way.
Once you are logged in, you’ll see an opening screen like the one shown here.
 IDG
IDG
Figure 1. The GitPod welcome screen
Let’s open an existing React application in GitPod and test it out.
Click the New Workspace button, which will launch a window that lets you browse GitHub repositories or enter a URL for a specific one. We’re going to use GitHub's React template project for this example. GitPod wants the Git clone URL, which you can find in the project by clicking the Code button in the project details, as shown in Figure 2.
 IDG
IDG
Figure 2. Find the Git clone URL
The URL that comes back is: https://github.com/cruip/open-react-template.git. Back in the GitPod UI, enter that URL into the import dialog and click the project that comes back. You can accept the defaults and finish creating the project. This will automatically import the repository into GitPod, open the development environment view, and run the project in dev mode. You can see all of this in Figure 3.
 IDG
IDG
Figure 3. The React project running in dev mode
GitPod basically acts like an in-browser version of Visual Studio Code (VS Code). In the bottom pane is the shell terminal, where you will see the project being built. Let’s take a look at the project's output. Click the PORTS tab in the bottom window. This returns a list of all the applications and where they are listening. In this case, the new React app is listening on port 3000. In the Address column, you’ll see the URL where you can view the live application. You can click the View in Browser button (or copy and paste the URL), which will give you a view of the running React template, as shown in Figure 4.
 IDG
IDG
Figure 4. The React app running in the browser
That was easy. GitPod figured out a lot about the example project without any support from us, including what kind of virtual machine to use, what services (like Node.js and NPM) were required, and how to start the project in dev mode using the command: npm run start.
Also note that GitPod generated a .gitpod.yaml file to capture what it learned about the project. That file is a good example of how GitPod describes project metadata, including the base Docker image to use. If you click on the Terminal tab of your running project and stop it with Ctrl-c then look at the directory with ls, you’ll see the .gitpod.yaml file and you can take a look at it. You will see something like the markup in Listing 1.
Listing 1. GitPod records project details in a YAML file
gitpod /workspace/open-react-template (master) $ cat .gitpod.yml
# This configuration file was automatically generated by Gitpod.
# Please adjust to your needs (see https://www.gitpod.io/docs/introduction/learn-gitpod/gitpod-yaml)
# and commit this file to your remote git repository to share the goodness with others.

# Learn more from ready-to-use templates: https://www.gitpod.io/docs/introduction/getting-started/quickstart

tasks:
  - init: npm install && npm run build
    command: npm run start
By default, GitPod uses a Docker image called workspace-full, which includes many languages and tools. In our case, we are relying on it having Node and NPM installed. We could fine-tune things by specifying a more targeted image that includes only the tools we need, and if necessary, we could define or find an image customized to our needs. You can tell gitpod.yaml to use a Docker image URL or a Dockerfile with the image config. GitPod hosts many common use case images on its Docker Hub.
See the GitPod documentation to learn more about workspaces and gitpod.yaml.
Creating workspaces and projects
When creating a new workspace there currently isn’t a way to spawn a blank project from GitPod, although there have been discussions about it. Basically, you need to start with an existing Git repository. So you can just go into your GitHub account, create a new blank project, and import it into GitPod.
GitPod has the concepts of both workspaces and projects. A workspace is an ephemeral entity, which is used for development tasks, while a project is a permanent container for workspaces. When using a workspace, the Git repository backing it is the long-term persistence. A project is useful for collaboratively managing products.
Workspaces are automatically shut down after 24 hours of inactivity and are ultimately deleted after 14 days. Projects are saved and can be reused indefinitely.
An interesting outcome of the CDE concept as manifested by GitPod is the reproducibility of workspaces. It becomes trivial and simple to spin up identical workspaces between developers. This is perhaps the greatest argument in favor of the CDE concept. The greatest argument against CDEs is probably the fact that for enterprise settings, you have to pay for your IDE, which in traditional development is usually free or cheap.
Setting breakpoints in Java code
Now let’s try setting a breakpoint in Java code. We can close the current React workspace by going to the menu in the upper left corner of the screen and selecting Stop Workspace. That will take us to the dashboard and we can click New Workspace. For this example, let's use the github.com/gitpod-samples/spring-petclinic repository.
While we’re here, notice that you also have the option to set the editor and virtual machine types. We're currently using the default editor, so let's stick with that. The other choices are desktop IDEs, like Eclipse, VS Code, and IntelliJ, which GitPod can launch for you configured with the options you specify. The VM choices are similar to those you’d find in any cloud computing platform menu.
Once the new workspace launches, it’ll have the Spring PetClinic demo application set up inside it. This application demonstrates many capabilities, including how to run multiple services. Once GitPod has started up the application, you can check the Ports tab and see that it is listening on both ports 8080 and 35729; the screen should be similar to what's shown in Figure 5.
 IDG
IDG
Figure 5. The PetClinic application listening on two ports
Port 8080 is the main application and port 35279 is the Spring Actuator service, which is used to monitor the application. You can see what this produces by going to the main URL at /manage.
Figure 5 also shows the application in the preview pane (see the top right corner). You can also open the application in another tab by clicking the URL. Either way, let’s set a breakpoint and trigger it. We can open a file in the Explorer by clicking Explorer in the left-hand menu, or by hitting Ctrl/Cmd-p. We are going to open the OwnerController.java file at path src/main/java/org/springframework/samples/petclinic/owner/OwnerController.java. Then, set a breakpoint as I’ve done in Figure 6.
 IDG
IDG
Figure 6. Setting a breakpoint in the Java application
We are now in the processCreationForm() method, where calls to create a new pet owner will be routed by the Spring Rest endpoint mapping: @PostMapping("/owners/new").
Now that the breakpoint is set, we need to restart the application in debug mode. In the terminal window, hit C>trl/⌘-c to break. Now navigate to the PetClinicApplication.java file and on the main() method, you’ll notice the Run and Debug links available (shown in Figure 7). Click Debug.
 IDG
IDG
Figure 7. Run and Debug in GitPod
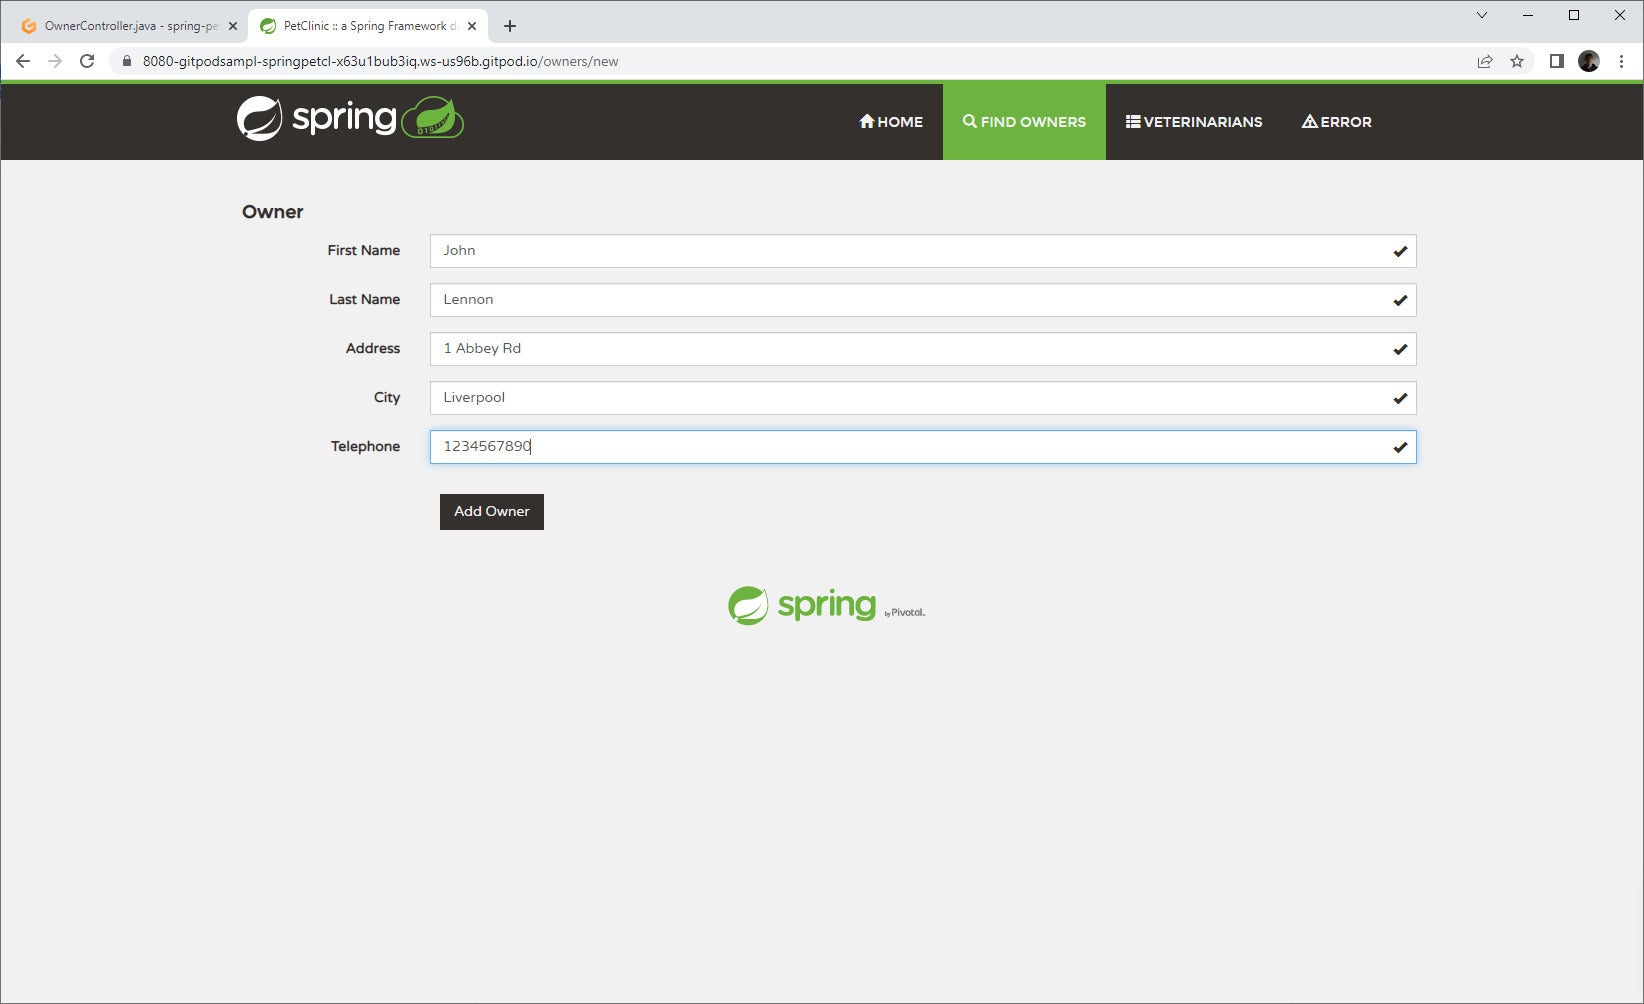
Once that starts up, open the application (in the Ports tab URL or in the preview pane) and click Find Owners followed by New Owner. That will open the form to create a new owner. Fill in some info and hit Add Owner.
 IDG
IDG
Figure 8. Activating the breakpoint
This will hit the PetOwner controller and the breakpoint we set, and back on GitPod, you’ll see the CDE waiting for you with all the normal accouterments of a paused debugger, as shown in Figure 9.
 IDG
IDG
Figure 9. The paused debugger
Conclusion
GitPod gives you a full-featured, browser-based IDE and shell access in an easy-to-manage package. It does require a bit of a mind shift from using a local IDE, in that you have to think about the state of persistence rather than knowing that everything is written to your local drive. It can also be a bit different to think about configuring the machine you are on via the shell, in terms of getting things installed and ensuring you are saving and reusing the VM you want across different sessions. Those considerations are common to all distributed cloud environments.
At the end of the day, though, these considerations are also benefits, since one of the main hopes in a CDE is that a developer is creating reproducible, configured environments that can be shared, rather than just something that “works on my machine."
Developers will likely continue to use local IDEs forever, but there is room for both. When properly understood and deployed, the CDE can be a great addition to your development team’s overall approach.