


JHipster is a long-lived and ambitious hybrid Java and JavaScript project that is dedicated to easing the development of full-stack Java applications using modern reactive front ends. The JHipster development team has consistently released new versions to keep up with industry changes. Let’s learn what this framework can do by building a simple application.
What is JHipster?
Out of the box, JHipster supports React, Vue, and Angular for the front end. It supports other frameworks, including Svelte, via plugins known as blueprints. On the back end, Spring Boot does the heavy lifting. In this regard, JHipster is similar to the Hilla framework, but with a more ambitious goal of supporting a wide variety of front-end stacks. At heart, JHipster is an advanced build tool that unifies the Java and JavaScript build toolchains and layers various administrative capabilities on top.
In addition to full-stack applications, JHipster supports building microservices components and has scaffolding for both JPA-based relational datastores and NoSQL datastores such as MongoDB and Cassandra. It also has features for logging and analytics.
JHipster's toolset includes a command line and a domain-specific language (DSL) with a visual data modeler and a web-based constructor (think Spring Initializr on steroids). We'll use the command line to get started. Note that you'll need a system with fairly current Java, Node.js, and Git versions installed.
The JHipster example application
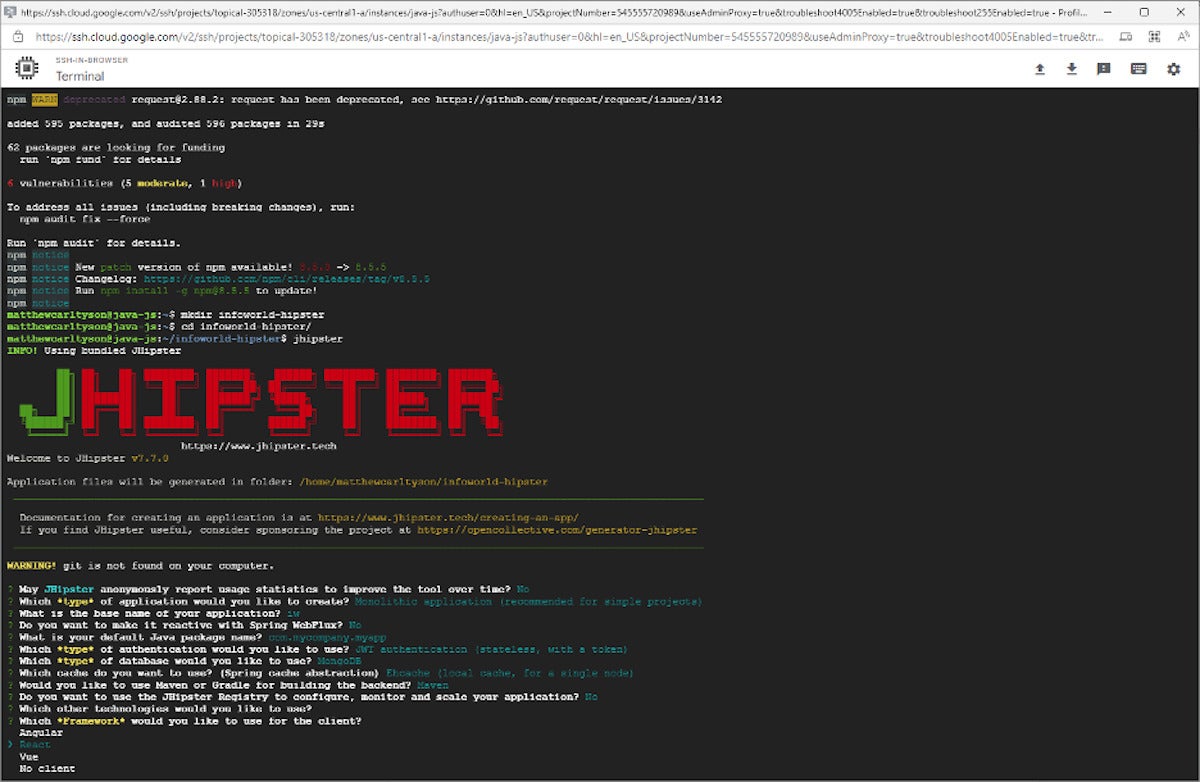
Follow the JHipster quickstart to install the generator-jhipster NPM package and create a new directory to run the generator.
You'll see an interactive prompt similar to what is shown in Figure 1.
 IDG
IDG
You can accept most of the defaults, but for this example we'll use MongoDB as the database and React as the front-end framework (choose whatever Bootswatch theme reflects your mood). Once you've set these options, JHipster will do its thing and leave you with a new application in the directory you've just created.
Build and run the application
JHipster has now generated the two halves of a full-stack Java and JavaScript application. The back end is built with Maven and the front end is built with webpack. You can run the two halves simultaneously to get the application started. (Remember that you also need MongoDB running in the background.)
In one shell, enter: ./mvn -P-webapp. This command will build and run the Java back end. We use the -P-webapp flag to avoid having Maven run the webpack portion of things.
In another shell, enter: npm start. This command builds the front end and runs it in webpack's dev mode, with the API calls pointed at the Java server you've just started.
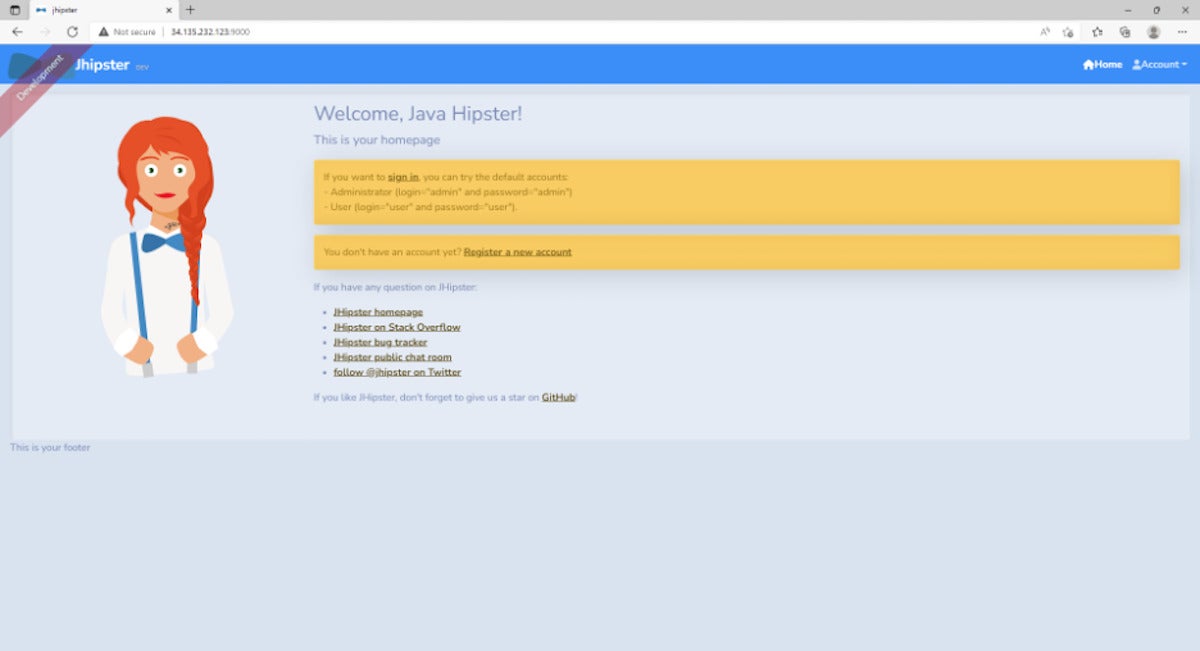
If all has gone well, you’ll be greeted at localhost:8080 with a screen similar to the one shown in Figure 2.
 IDG
IDG
Create a test user
If you poke around the application, you’ll quickly discover there’s a lot here. JHipster's generator outputs much more than your typical tool, including functional user management and a JWT-based authentication system. The application also has default accounts in place, which we will use to create a test user.
To start, use the Register option on the upper-right side of the application screen to create a new user. Next, create a test user (test@test.com), then go to log in and select the default admin/admin user. Navigate to the user management screen (Administration -> User Management). Notice that your new user is listed. You can activate the user by toggling the inactive button to active, then log in as the test user. Notice that this user cannot access the admin console.
As I said, this is a lot of out-of-the-box functionality, especially when you consider that JHipster supports not only the React and MongoDB stack, but also Angular, Vue, and a host of SQL and NoSQL datastores.
Explore the code
To support all this functionality, as you can imagine, JHipster has quite a bit of code in place. Fortunately, it is largely up-to-date and follows programming best practices. For instance, the React code uses functional components, leverages hooks, and runs against a centralized Redux store.
Take a look at the application directory and you’ll see a structure like this:
/foundry-jhipster//webpack/: Config/utils for the webpack bundle/src/main//java/: Java sources/webapp/: Front-end sources
/target/: Output directory for both builds/webapp/: Front-end build output/java/: Back-end build output/docker/: Files to support containerization
The main class for the Java application is src/main/java/com/mycompany/myapp/JhipsterApp.java. It is a Spring Boot web application at heart, and can be configured with command-line arguments via --spring.profiles.active=your-active-profile.
The Java application out of the box is essentially the API for user CRUD (create, read, update, and delete) functions with authentication and authorization enforcement via Spring Security. The Spring Security system is configured in /myapp/security. Remember that JHipster is using JSON Web Token, so the classes to support that are in /security/jwt.
The application's domain models are defined in /domain, which is the counterpart to the front end /entities directory that you’ll see shortly.
Find the the available front-end scripts by looking at package.json. In addition to the dev mode command we are using right now, other features include a mongodb prune command, tests, and production build commands.
The client entry is at /src/main/webapp/index.html, but the real work begins in /sec/main/webapp/app/app.tsx, which defines the application router (routes are defined in router.tsx) that will host the various page components.
You can find the application's web page components defined in main/webapp/app/modules; for example, /home/home.tsx has the homepage definition.
In the /main/webapp/app/shared directory, you’ll find the code used across the application. Much of this is devoted to the central store, like the model definition and reducers. Presently, the application only deals with users, so only these components and the authentication code live in the shared directory.
The /entities folder contains the code to support your modeled entities. Note, though, that the user model is stored in the shared directory. There are no entities yet, so let’s add some.
Define a model: JDL and JDL-Studio
JDL is JHipster's domain-specific language for defining application models. It does a lot more than that—you can define an entire application with JDL metadata—but we'll focus on the model.
To start, let's use JDL-Studio, JHipster's online tool, to quickly generate some CRUD functionality for a domain model. You’ll see an entity relationship builder like the one shown Figure 3.
 IDG
IDG
The JDL builder supports defining entities and their properties, as well as the relationships between them. We won't dive into the syntax here because it’s fairly self-explanatory. You can explore the syntax by making changes on the left-side definition and observing how they're expressed in the visual display.
Let’s accept the given relationships and export them by hitting the Download this JDL source button on the top-right side of the screen. (Notice that there are several options in the toolbar for configuring how things look and behave.)
Once you have the file, go to your command line at the project root and type jhipster jdl my-jdl-file.jdl, where my-jdl-file.jdl is the name of the file you've just exported.
The prompt will ask if you want to overwrite a couple of files. Go ahead and do that. Once it's done, you can restart the servers and see what you’ve added to the application. Go back to the browser and open the application again on port 9000, and log in as admin/admin.
Now, when you open the Entities menu item in the navigation bar, you get all those entities you just imported, along with a fully realized console for managing them. For example, you can create a new “Country” entity, then go create a new “Location” entity and use the newly created country in your location. Notice that all the CRUD capabilities are there, as well.
Monitoring and API administration
A couple of additional features for admin users are worth noting. The Administration menu includes a Metrics option that provides insight into the characteristics of the running JVM, as shown in Figure 4. See the JHipster documentation for more about its monitoring features.
 IDG
IDG
JHipster also generates OpenAPI/Swagger definitions for its back-end endpoints, along with a simple console for interacting with them. Figure 5 shows the API administration screen.
 IDG
IDG
JHipster delivers all of this with a flexible architecture that allows for different datastores and front-end frameworks. All in all, it's an impressive framework.