nbdev v2 review: Git-friendly Jupyter Notebooks
Add-on to Jupyter Notebooks enables a literate Python development style that gives you high-quality documentation, tests, continuous integration, and packaging for free.


Contributing Editor, InfoWorld |

-
nbdev v2.3.9
There are many ways to go about programming. One of the most productive paradigms is interactive: You use a REPL (read-eval-print loop) to write and test your code as you code, and then copy the tested code into a file.
The REPL method, which originated in LISP development environments, is well-suited to Python programming, as Python has always had good interactive development tools. The drawback of this style of programming is that once you’ve written the code you have to separately pull out the tests and write the documentation, save all that to a repository, do your packaging, and publish your package and documentation.
Donald Knuth’s literate programming paradigm prescribes writing the documentation and code in the same document, with the documentation aimed at humans interspersed with the code intended for the computer. Literate programming has been used widely for scientific programming and data science, often using notebook environments, such as Jupyter Notebooks, Jupyter Lab, Visual Studio Code, and PyCharm. One issue with notebooks is that they sometimes don’t play well with repositories because they save too much information, including metadata that doesn’t matter to anyone. That creates a problem when there are merge conflicts, as notebooks are cell-oriented and source code repositories such as Git are line-oriented.
Jeremy Howard and Hamel Husain of fast.ai, along with about two dozen minor contributors, have come up with a set of command-line utilities that not only allow Jupyter Notebooks to play well with Git, but also enable a highly productive interactive literate programming style. In addition to producing correct Python code quickly, you can produce documentation and tests at the same time, save it all to Git without fear of corruption from merge conflicts, and publish to PyPI and Conda with a few commands. While there’s a learning curve for these utilities, that investment pays dividends, as you can be done with your development project in about the time it would normally take to simply write the code.
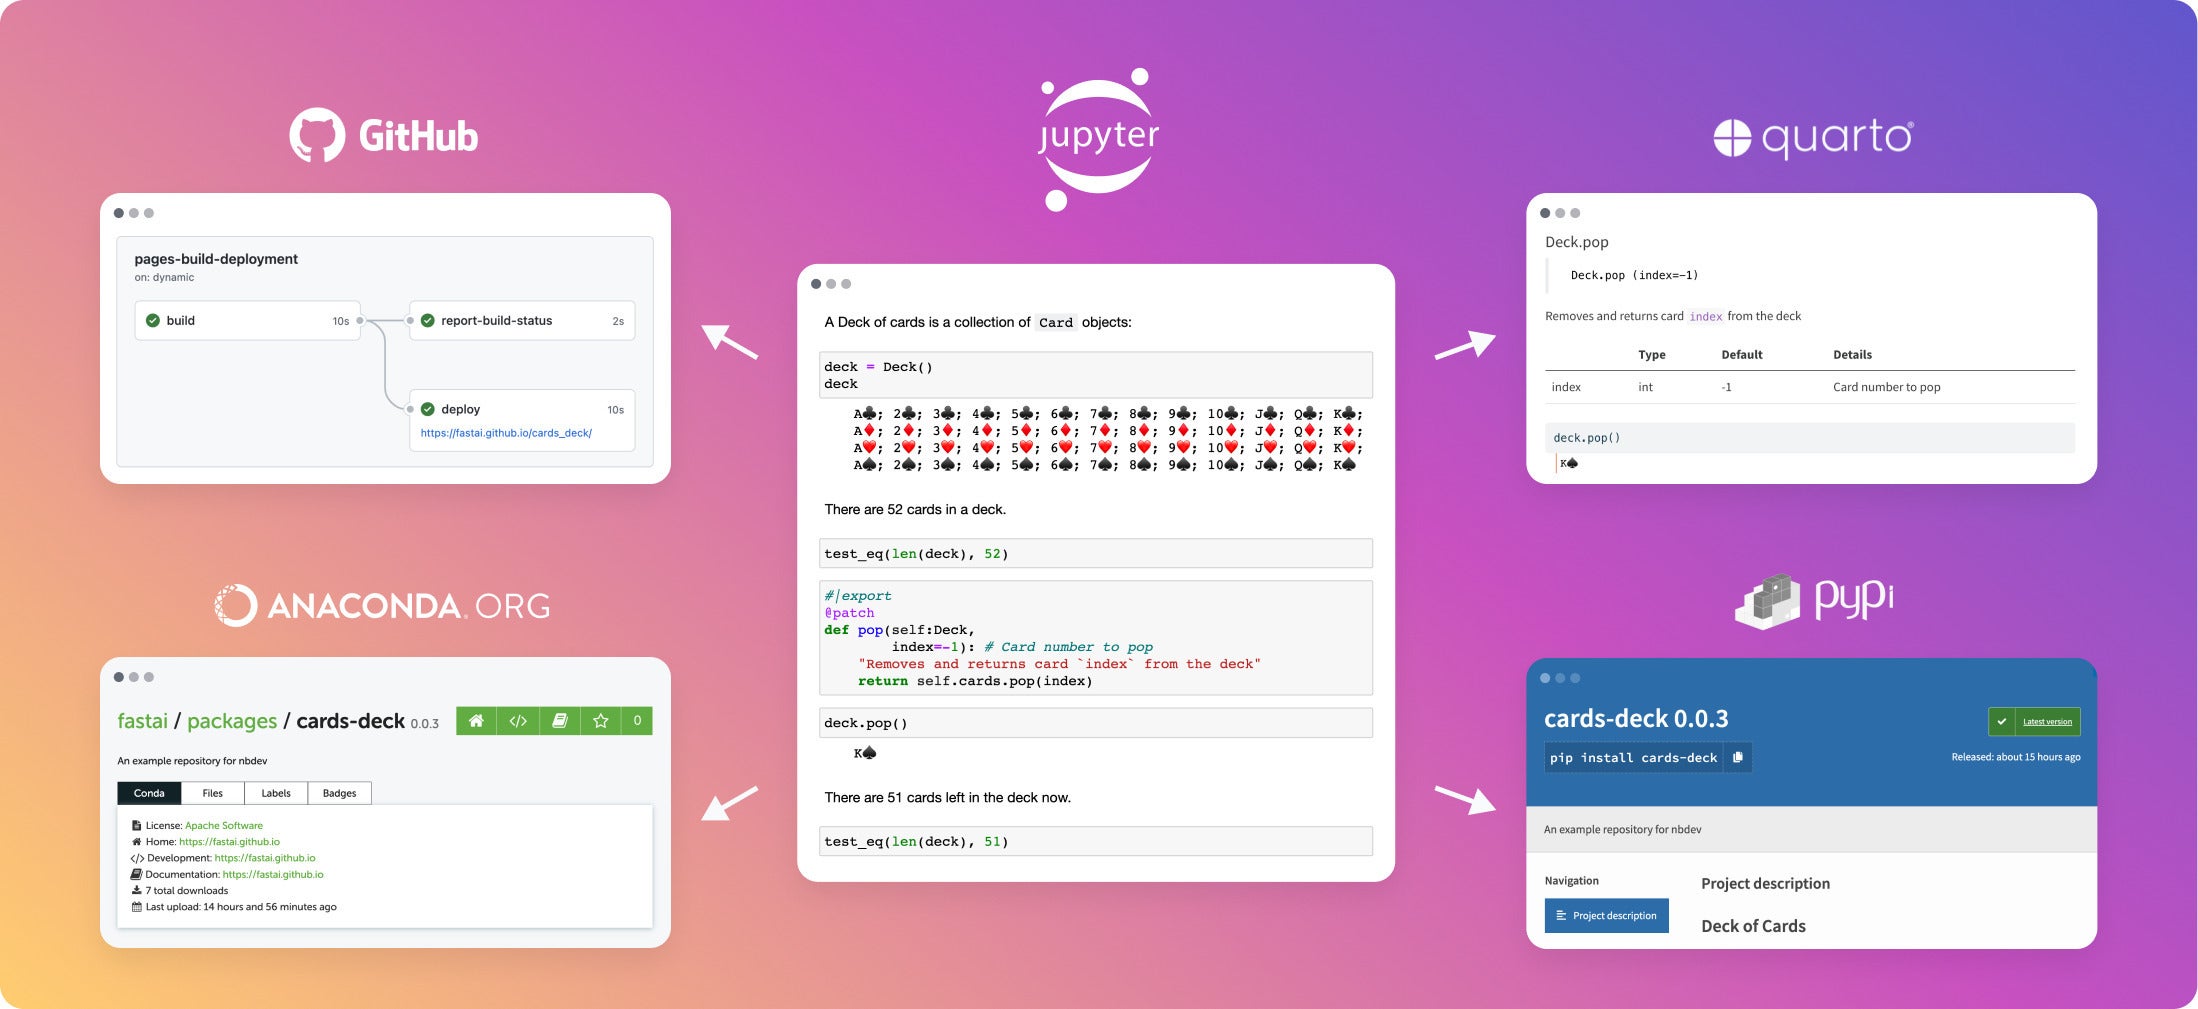
As you can see in the diagram below, nbdev works with Jupyter Notebooks, GitHub, Quarto, Anaconda, and PyPI. To summarize what each piece of this system does:
- You can generate documentation using Quarto and host it on GitHub Pages. The docs support LaTeX, are searchable, and are automatically hyperlinked.
- You can publish packages to PyPI and Conda as well as tools to simplify package releases. Python best practices are automatically followed, for example, only exported objects are included in __all__.
- There is two-way sync between notebooks and plaintext source code, allowing you to use your IDE for code navigation or quick edits.
- Tests written as ordinary notebook cells are run in parallel with a single command.
- There is continuous integration with GitHub Actions that run your tests and rebuild your docs.
- Git-friendly notebooks with Jupyter/Git hooks that clean unwanted metadata and render merge conflicts in a human-readable format.
 IDG
IDG
The nbdev software works with Jupyter Notebooks, GitHub, Quarto, Anaconda, and PyPi to produce a productive, interactive environment for Python development.
nbdev installation
nbdev works on macOS, Linux, and most Unix-style operating systems. It requires a recent version of Python 3; I used Python 3.9.6 on macOS Ventura, running on an M1 MacBook Pro. nbdev works on Windows under WSL (Windows Subsystem for Linux), but not under cmd or PowerShell. You can install nbdev with pip or Conda. I used pip:
pip install nbdevThat installed 29 command-line utilities, which you can list using nbdev_help:
% nbdev_help
nbdev_bump_version              Increment version in settings.ini by one
nbdev_changelog                 Create a CHANGELOG.md file from closed and labeled GitHub issues
nbdev_clean                     Clean all notebooks in `fname` to avoid merge conflicts
nbdev_conda                     Create a `meta.yaml` file ready to be built into a package, and optionally build and upload it
nbdev_create_config             Create a config file.
nbdev_docs                      Create Quarto docs and README.md
nbdev_export                    Export notebooks in `path` to Python modules
nbdev_filter                    A notebook filter for Quarto
nbdev_fix                       Create working notebook from conflicted notebook `nbname`
nbdev_help                      Show help for all console scripts
nbdev_install                   Install Quarto and the current library
nbdev_install_hooks             Install Jupyter and git hooks to automatically clean, trust, and fix merge conflicts in notebooks
nbdev_install_quarto            Install latest Quarto on macOS or Linux, prints instructions for Windows
nbdev_merge                     Git merge driver for notebooks
nbdev_migrate                   Convert all markdown and notebook files in `path` from v1 to v2
nbdev_new                       Create an nbdev project.
nbdev_prepare                   Export, test, and clean notebooks, and render README if needed
nbdev_preview                   Preview docs locally
nbdev_proc_nbs                  Process notebooks in `path` for docs rendering
nbdev_pypi                      Create and upload Python package to PyPI
nbdev_readme                    None
nbdev_release_both              Release both conda and PyPI packages
nbdev_release_gh                Calls `nbdev_changelog`, lets you edit the result, then pushes to git and calls `nbdev_release_git`
nbdev_release_git               Tag and create a release in GitHub for the current version
nbdev_sidebar                   Create sidebar.yml
nbdev_test                      Test in parallel notebooks matching `path`, passing along `flags`
nbdev_trust                     Trust notebooks matching `fname`
nbdev_update                    Propagate change in modules matching `fname` to notebooks that created them
The nbdev developers suggest either watching this 90-minute video or going through this roughly one-hour written walkthrough. I did both, and also read through more of the documentation and some of the source code. I learned different material from each, so I’d suggest watching the video first and then doing the walkthrough. For me, the video gave me a clear enough idea of the package’s utility to motivate me to go through the tutorial.
Begin the nbdev walkthrough
The tutorial starts by having you install Jupyter Notebook:
pip install notebookAnd then launching Jupyter:
jupyter notebookThe installation continues in the notebook, first by creating a new terminal and then using the terminal to install nbdev. You can skip that installation if you already did it in a shell, like I did.
Then you can use nbdev to install Quarto:
nbdev_install_quartoThat requires root access, so you’ll need to enter your password. You can read the Quarto source code or docs to verify that it’s safe.
At this point you need to browse to GitHub and create an empty repository (repo). I followed the tutorial and called mine nbdev_hello_world, and added a fairly generic description. Create the repo. Consult the instructions if you need them. Then clone the repo to your local machine. The instructions suggest using the Git command line on your machine, but I happen to like using GitHub Desktop, which also worked fine.
In either case, cd into your repo in your terminal. It doesn’t matter whether you use a terminal on your desktop or in your notebook. Now run nbdev_new, which will create a bunch of files in your repo. Then commit and push your additions to GitHub:
git add .
git commit -m'Initial commit'
git push
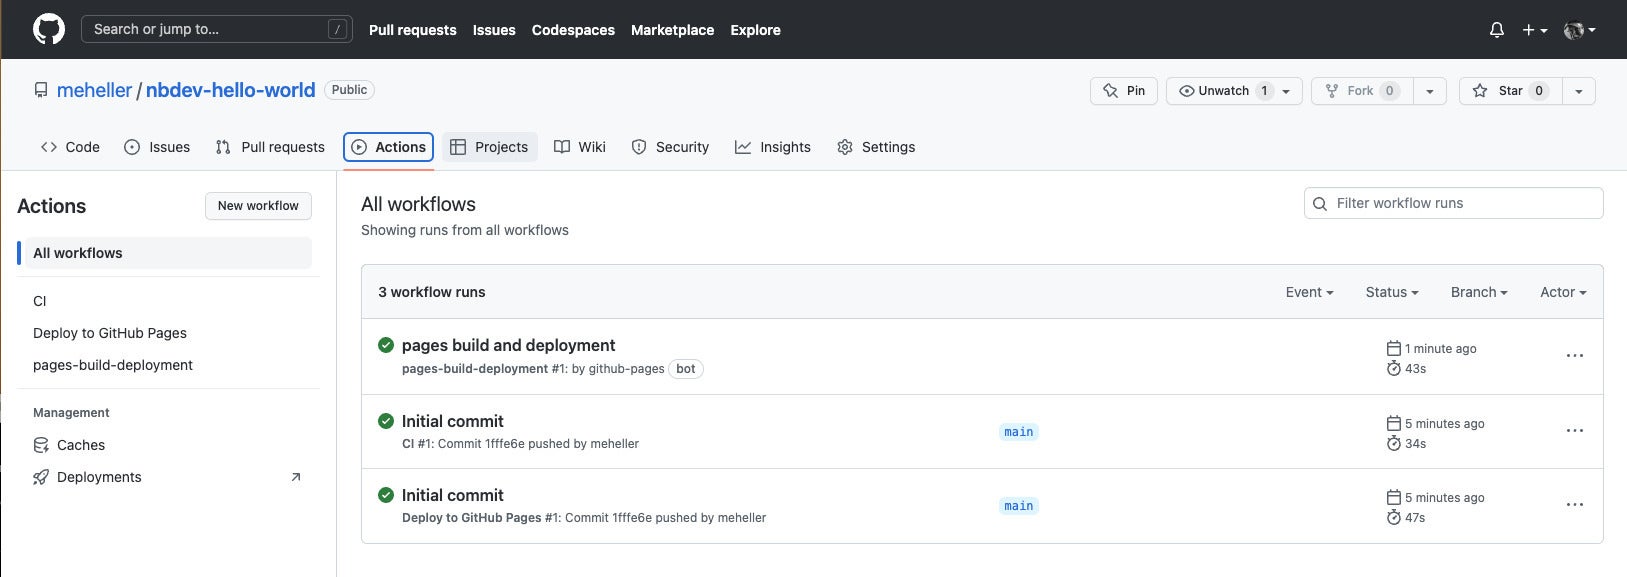
Go back to your repo on GitHub and open the Actions tab. You’ll see something like this:
 IDG
IDG
GitHub Actions after initial commit. There are two: a continuous integration (CI) workflow to clean your code, and a Deploy to GitHub Pages workflow to post your documentation.
Now enable GitHub Pages, following the optional instructions. It should look like this:
 IDG
IDG
Enabling GitHub Pages.
Open the Actions tab again, and you’ll see a third workflow:
 IDG
IDG
There are now three workflows in your repo. The new one generates web documentation.
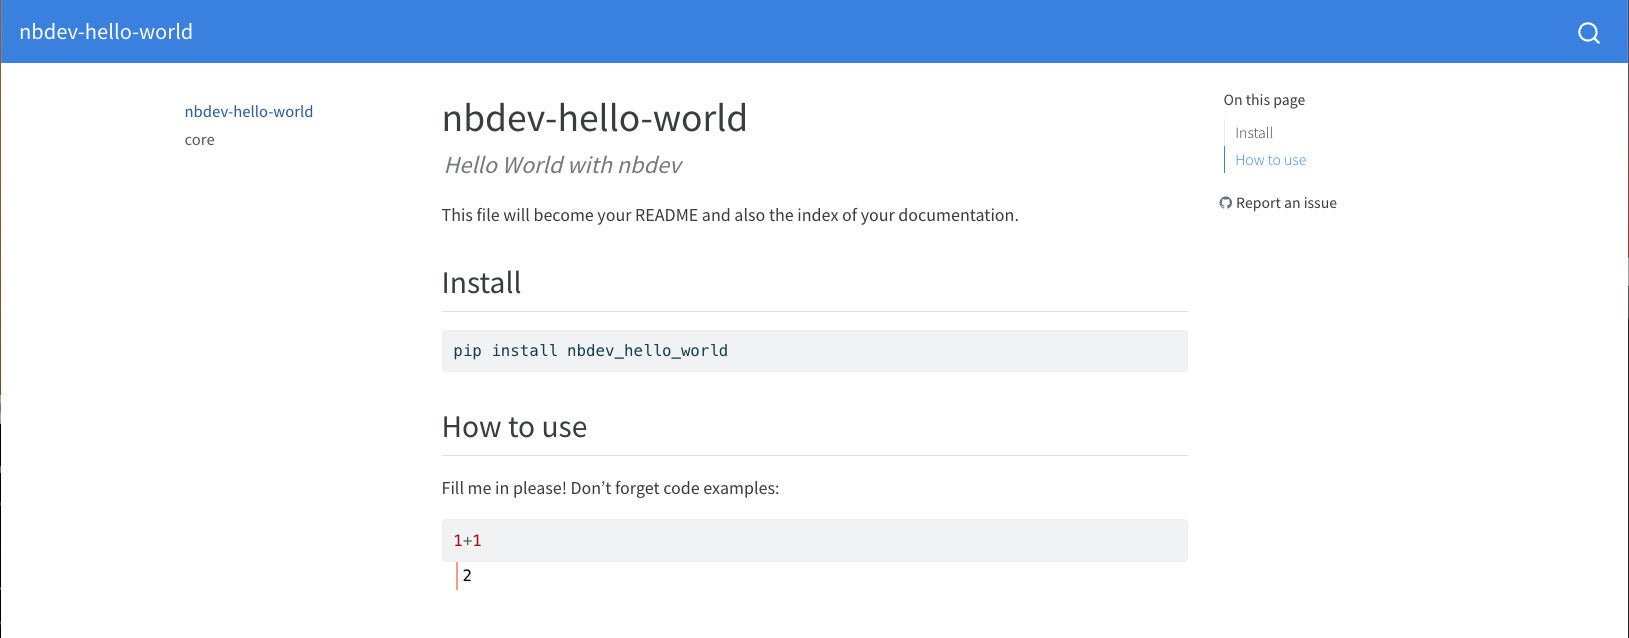
Now open your generated website, at https://{user}.github.io/{repo}. Mine is at https://meheller.github.io/nbdev-hello-world/. You can copy that and change meheller to your own GitHub handle and see something similar to the following:
 IDG
IDG
Initial web documentation page for the package.
Continue the nbdev walkthrough
Now we’re finally getting to the good stuff. You’ll install web hooks to automatically clean notebooks when you check them in,
nbdev_install_hooksexport your library,
nbdev_exportinstall your package,
pip install -e '.[dev]'preview your docs,
nbdev_preview(and click the link) and at long last start editing your Python notebook:
jupyter notebook(and click on nbs, and click on 00_core.ipynb).
Edit the notebook as described, then prepare your changes:
nbdev_prepare
Edit index.ipynb as described, then push your changes to GitHub:
git add .
git commit -m'Add `say_hello`; update index'
git push
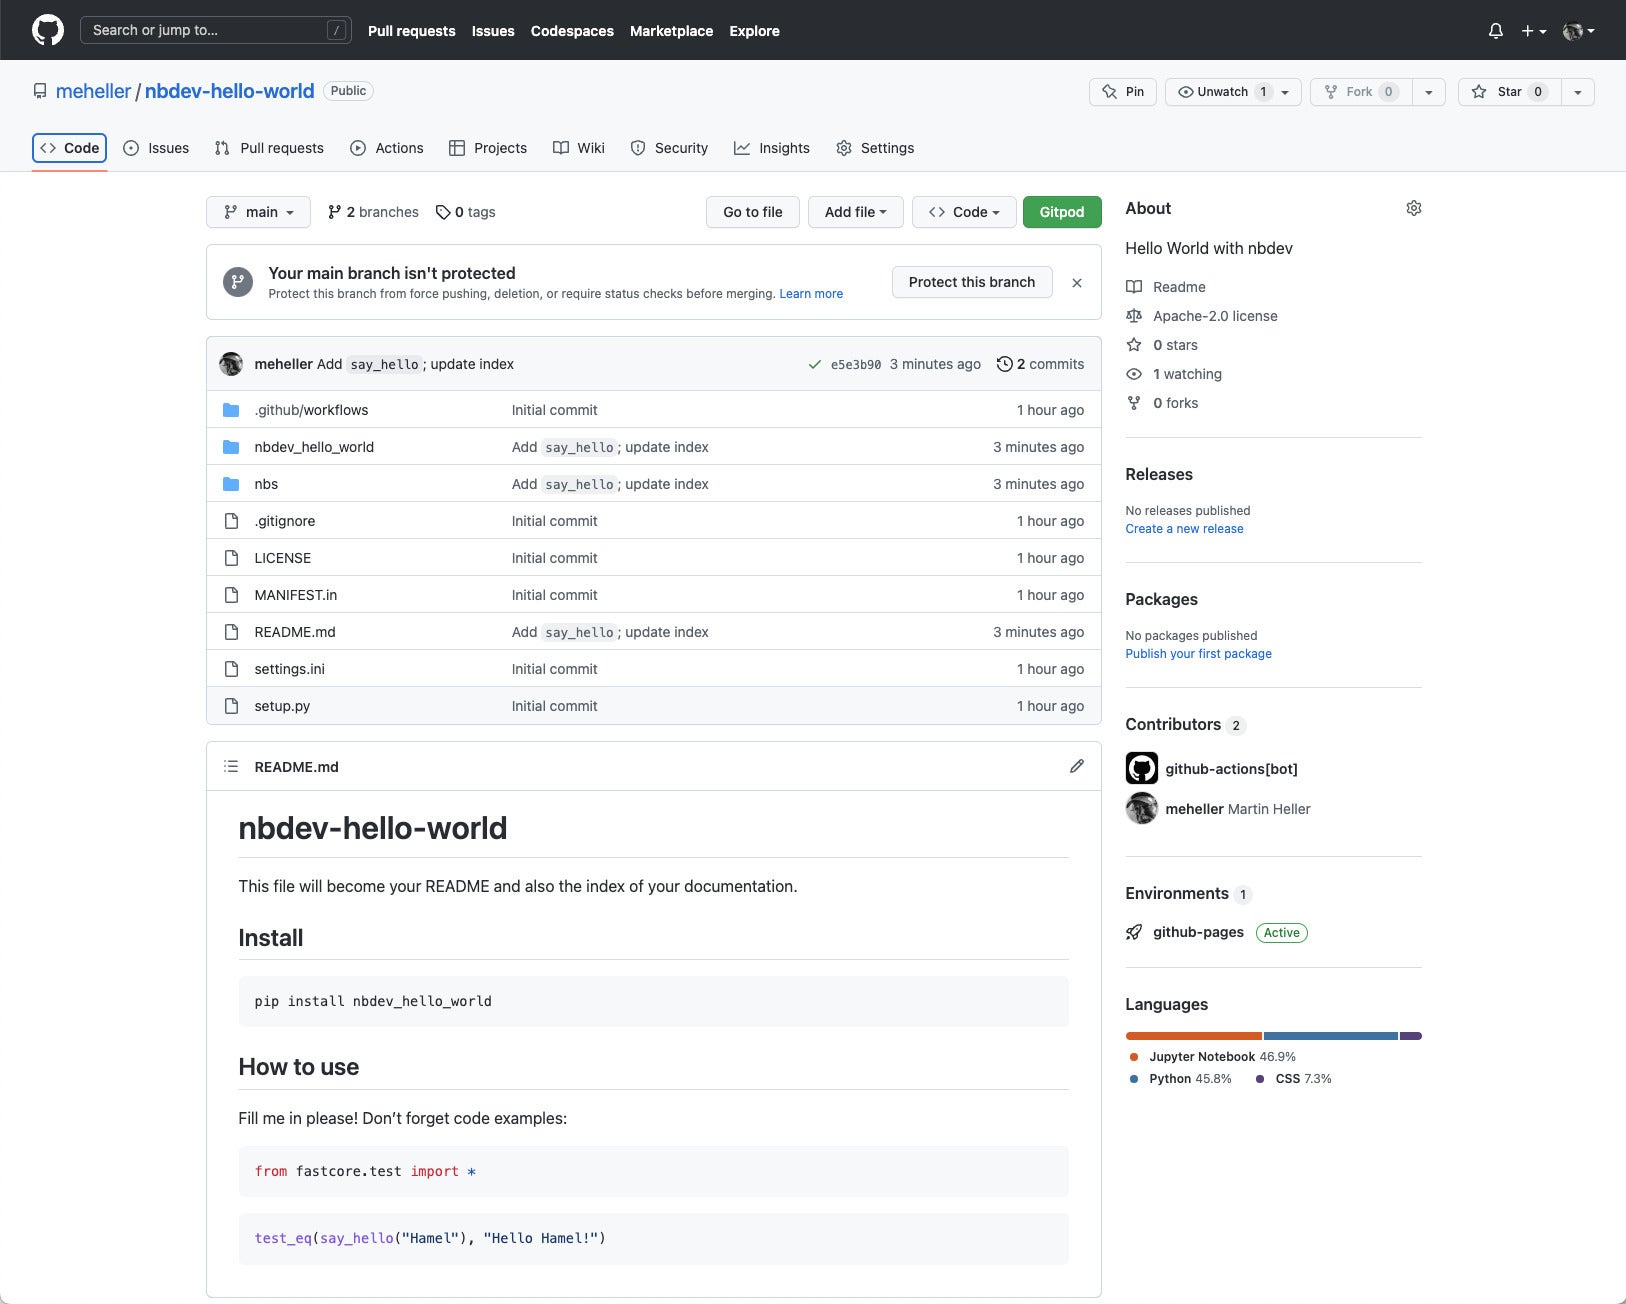
If you wish, you can push on and add advanced functionality.
 IDG
IDG
The nbdev-hello-world repo after finishing the tutorial.
As you’ve seen, especially if you’ve worked through the tutorial yourself, nbdev can enable a highly productive Python development workflow in notebooks, working smoothly with a GitHub repo and Quarto documentation displayed on GitHub Pages. If you haven’t yet worked through the tutorial, what are you waiting for?
—
Contact: fast.ai, https://nbdev.fast.ai/
Cost: Free open source under Apache License 2.0.
Platforms: macOS, Linux, and most Unix-style operating systems. It works on Windows under WSL, but not under cmd or PowerShell.
Copyright © 2023 IDG Communications, Inc.